» This is Part 1 of 3 part series. Be sure to check out Part 2 and Part 3.
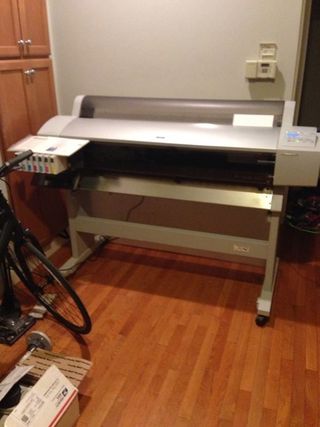
So, what started as a simple desire to enlarge some of my photos ended up with me on Craigslist and ultimately hauling a six foot wide, 100+ lb printer from South Jersey into my one bedroom NYC apartment. Go big or go home, right?
Is it Y2k compliant?
The Epson Stylus Pro 9600 with Ultrachrome ink is a bit of a throwback (mine was manufactured in 2004) but, from what I’ve read, it is still the workhorse of many print shops and photographers. However, the biggest con of buying antiquated (and used) hardware is digging up all the manuals and software necessary to get things running. In my ongoing effort to give back to the internet, I’m documenting my experience and trying to centralize some of the information I’ve found thus far.
One of the more interesting things I’ve noticed is that given that this printer was first introduced over a decade ago, some of the web pages devoted to it (like here and here) look like something you’d find on the Wayback Machine; lots of pixelated gifs and centered white text on black backgrounds, if you catch my drift.
My Mac OS X 10.8.x didn’t recognize the 9600 when I first plugged in the USB. So, my first stop was the Official Epson 9600 product page. Luckily they have drivers compatible with the latest versions of Mac OS X. Not as much luck with the utilities, ICC profiles, and firmware, however.
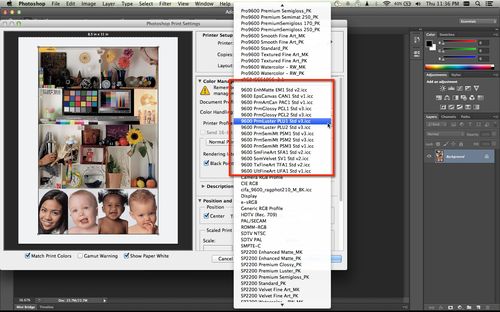
On the Drivers and Downloads page, there is a link to a set of ICC profiles produced by Bill Atkinson, which are purportedly better than those that come with the standard printer driver. Unfortunately, the files available for Mac’s all have a .SEA.HQX extension which is an ancient compression format (Mac 9 or earlier). You’ll be able to use the standard Archive Utility app to extract the .SEA file from the .HQX archive, but the resulting .SEA file is an executable archive can’t be opened in newer versions of Mac OS (Leopard, Snow Leopard, Lion, Mountain Lion, Maverick). If you don’t understand what all that meant, ignore it, and just know that using some Technomancery©, I was able to extract the profiles and a link to a Mac OS X-compatible file containing all the Bill Atkinson 9600/7600 icc profiles is available below. All you need to do is double click the zip file and copy the .ICC files to Macintosh HD > Library > ColorSync > Profiles. You’ll be prompted for your password to copy files into this directory.
Once you’ve loaded the profiles they will appear in the list of the Printer Profiles when you print from Photoshop.
Moment of Truth
From the previous owner I learned that the printer had been sitting idle for a few months (at least). The first thing I did was to print off a standard test file on a sheet of 8.5’x11″ Epson Premium Photo Glossy paper to see where things stood. First results were promising. No noise from the printer that would imply any worrisome mechanical issues and the print itself was fairly sharp. I was so pleased I even went ahead and shot off a 36″x44″ print using a roll of Epson Premium luster paper.
A second test with Epson Enhanced Matte Paper showed some fairly significant horizontal banding. A post to the Epson Wide Format Yahoo Group told me that this could be resolved by running through the Head Alignment utility on the control panel (details in the Epson Stylus Pro 7600/9600 Printer Guide, page 57). After a few runs, I was able to get rid of the banding. Thanks, jrstewart8.
Getting under the hood
Now you think I’d leave well enough alone, but dealing with the head alignment issue got me thinking about getting ahead any other potential maintenance issues. One of the most common issues cited on the forums was the printer head clogging. First stop, Nozzle Check. Result, not so good. There were very noticeable gaps in the Magenta and Yellow sections.
From a few of the resources below, I understood that I needed to get some windex and clean the printer head, capping station, flushing box, and wiper blade. This page from Northlight Images has a nice set of instructions on how to do this. This video shows how to get the head free and use a saturated paper towel to clean it. This video gives you a slight out-of-focus view into cleaning the wiper and capping station, albeit on a Epson 4600 (I think). The previous videos in conjunction with the repair manual from American Inkjet Systems should help illustrate the process for you (see Figs 2-15 & 2-15 on pgs. 12-13).
When I opened up the front cover, moved the head, and first inspected the station, I was not completely surprised to see tons (probably years worth) of dust and dried ink all over. I saturated a strip of paper towel with Windex and put it behind the head and let that sit while I worked on the rest. Now the AIS manual shows how to take of the whole side to get at the cleaning station, but I thought that would be tempting the Gods. (The Gods and I have have some history when it comes to electronics repair.) So, I left the screwdriver in the toolbox and worked on what I could access from the small opening. I had a syringe that I used to set up the continuous ink system on my Epson 2200 which gave me the reach I needed to saturate the capping station and flushing box. The wiper was a bit more difficult. I was able to reach it with some q-tips but wasn’t able to clean it as thoroughly as I would have liked. I ran through the steps three times with a standard clean (press the control panel button for 3 seconds) and nozzle check after each. (Hint; use plain cheap printer paper for the nozzle checks) It got worse before it got better. At the end however, I still had one tiny gap in the Magenta that would not go away.
I ran a power clean but that didn’t help and only succeeded in killing my Photo Black cartridge. Luckily, I had an extra. That’s the worse thing about using the clean cycles; they consume ink across the board -not just for the nozzle you’re trying to clear — and a lot if it. That gave me an idea (sure enough some others have come to the same conclusion before me) to just print a page of only that color to simulate a clean. An additional suggestion was to use as high a resolution as possible to do this, so I sacrificed a sheet of photo glossy to the cause and printed out a single sheet of magenta. Well, it was a nice idea in theory but in the end I still had that small gap.
I probably could waste more ink, paper, and time on this but, perfection is the enemy of done. So, I decided to let it go and move on. Given some of the severe head clogging posts I’ve read, I’m in good shape and probably approaching the point to diminishing returns. If I ever want to revisit this, it looks like the next option is to purchase cartridges filled with cleaning solution and run that (AbsoluteInkjet, Inksupply , and Amazon have them). Unfortunately, that’s a expensive investment and people seem to have mixed experiences with it.
Future-proofing
I believe the 9600 isn’t officially supported by Epson anymore. If it is, I have to imagine it’s soon approaching end-of-life status. So, if they’re going to stop making parts for it, I wanted to see where things stood with the consumables and hardware. I’ll probably want to stock up on some items now rather than when they become scarce and presumably more expensive. The Printer Status page (see page 131 in the EPSON 7600/9600 Quick Reference Guide) told me that the two motors and head were in great condition (5 stars). Great news given how expensive and difficult to replace those parts are. The automatic paper cutter blade was good (4 stars) but the Cleaner (2 stars) and Maintenance Tank (1 star) less so.
From what I’ve read the paper cutter blade (part # C12C815291) can’t be sharpened, so the only option is to lay down ~$100 for a replacement. Might be worth stocking up on one of these. Though, since this same part is used in the newer 9800, I’m not as worried about future availability. Also, I’ve been know to wield an X-Acto with some degree of skill.
An extra Maintenance Tank came with the printer when I bought it. Even then, this is where are the extra ink is dumped during ink cartridge changes and cleans, which happen frequently. It’s just a plastic tank with some absorbant material to catch the excess ink that somehow costs ~$25-$30. I read more than one forum that suggested reseting the maintenance tank chip and just replacing the absorbant material with .. *ahem* … tampons. For those men wanting to save themselves the awkwardness of buying feminine pads at CVS, you can use the chip resetter that came with the InkOwl Refillable Cartridges I ended up buying. When it gets full, I dump out the contents, pack it with 2 boxes of 2×2 Cotton Squares, and reset the chip.
I had no idea what “Cleaner” meant. Maybe it referred to the cleaner head (a.k.a wiper, part # 1113691) or the flushing box (part # 1112239) or cap assembly (part # 1091110), all of which I had tried to clean earlier. Wipers were hard to find. AIS and Ebay had them for $6 – $20. The other items are even harder to find. The few that google showed where in Europe and more than I spent on the printer itself. This might require more research.
Really though, the biggest concern is the ink cartridges. OEM inks range from $87 – $138. That’s likely to increase if Epson stops producing them. I bought a Continuous Ink System for my Stylus Pro 2200 for exactly the same reason. There are a number of refillable cartridges available at Ink2Image, InkOwl, Inksupply, InkPro2Day, InkJetMall, and of course Ebay. Though, I’m less concerned with the cartridge than I am with the quality of the ink. ConeColor seems to have well-regarded ink that allows people to use the standard Epson ICC profiles, which goes a long way in simplifying my digital workflow. After all this, I’m not investing in printer profiling hardware. (Edit: I ended up buying the InkOwl Refillable Cartridges on Amazon and eventually getting profiling hardware. Read more.)
I’ll follow up with another post when I’ve decided a course of action of these last items. Until then, here are some resources I found very helpful.
Files:
- Bill_Atkinson_ICC_profiles_9600_7600.zip
- EPSON 7600_9600 Field Repair Guide.pdf
- EPSON 7600_9600 Quick Reference Guide.pdf
- Epson 7600_9600 Service Manual.pdf
- EPSON 9600 Parts List.pdf
- American InJet Systems – Epson 9600 Repair.pdf
- Clean Sheets.zip – Black, Light Black, Magenta, Light Magenta, Cyan, Light Cyan, Yellow
Useful Links:
- Official Epson 9600 Stylus Pro
- Epson Wide Format Printer Group
- Luminous Landscape Forum
- Northlight Images – Error codes and service manual for the 7600 and 9600
- Northlight Images – Maintenance tank in Epson large format printers
- Northlight Images – Swapping the black ink on the Epson 7600 and 9600
- Northlight Images – Deactivate the ink level counter on the Epson 7600 and 9600
- DPReview Forums
- FixYourOwnPrinter Forum


